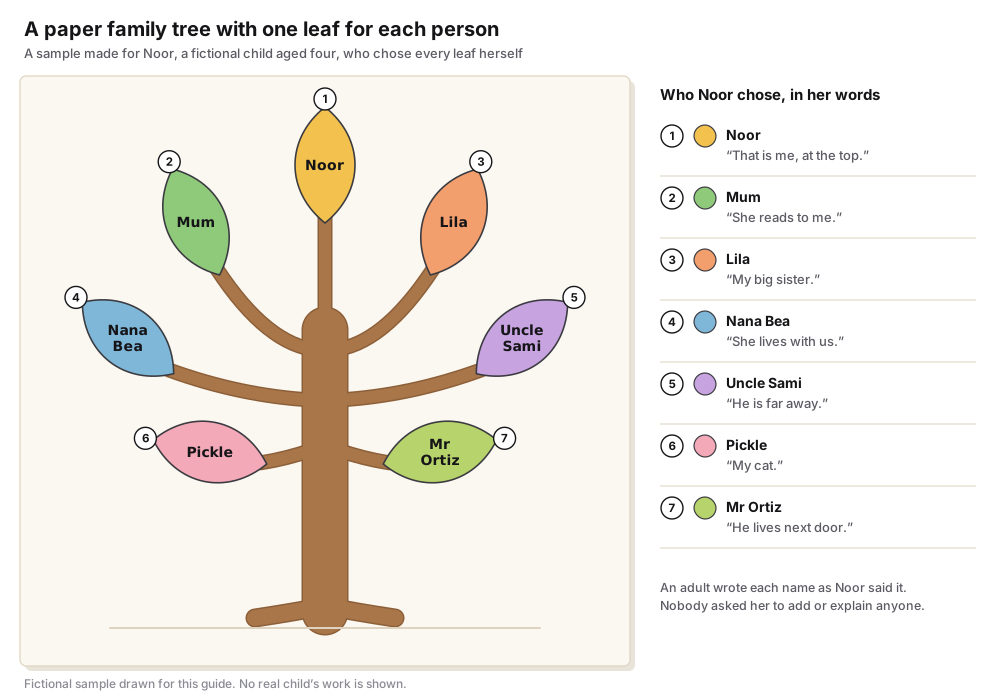
Each child sticks one leaf for each person they choose
An adult cuts a brown paper trunk and a pile of paper leaves before the session. Each child glues the trunk to a sheet of paper, picks a leaf for every person they want on the tree, and tells the adult whose leaf it is. The adult writes the name on the leaf in the child’s own words, and the child glues it on.
Nothing in the craft depends on a child knowing how relatives are connected. A preschool tree is a picture of the people a child feels they belong with, so the leaves hang in any order and the child decides how many there are.
| Material | What to prepare | If you do not have it |
|---|---|---|
| Backing sheet | One sheet of A3 or large construction paper for each child | Two sheets of printer paper taped along the long edge |
| Trunk | A brown paper strip about 20 cm tall, with thinner strips for branches | A trunk drawn with a brown crayon, or a real twig taped down |
| Leaves | About ten leaf shapes for each child, in several colours | Torn scraps of coloured paper, which small hands manage well |
| Glue | A glue stick for each pair of children | Paste and a brush, or stickers used as leaves |
| Crayons | Thick crayons or washable markers | Coloured pencils |
Offer children a choice of what family means
The words used to introduce the craft decide who feels able to join in. A child who lives with a grandparent, with foster carers, between two homes or with one parent can be left without an answer when the adult asks about mothers and fathers. Choose one of the wordings below, or read all three and let each child pick.
None of the wordings names a role that a child must fill. Each one leaves room for pets, friends, neighbours and people who have died, because preschool children often count them, and because nobody outside a family can say who belongs in it.
| What the adult says | Who it usually brings in | When it fits best |
|---|---|---|
| “Your family is the people who live with you.” | Everyone in the household, including carers and pets | A first session, because a child can picture home |
| “Your family is the people who love you and look after you.” | Relatives in other homes, close friends and childminders | Groups with children in foster or kinship care |
| “Your tree is for anyone you want on it.” | Whoever the child names, with no test at all | Any group, and any child who hesitates at the word family |
Make the tree in six short steps
The steps suit children aged three to five in groups of four to six with one adult. Allow about 30 minutes, and stop sooner if attention runs out, since a tree with two leaves is finished.
- Set out the pieces
Put a backing sheet, a trunk and a shared pile of leaves in front of each child.
- Glue the trunk
Show how to rub glue on the back of the trunk and press it near the bottom of the sheet.
- Ask who the tree is for
Read the wording you chose and ask each child who they would like on their tree.
- Choose a leaf for each person
Let the child pick a leaf and a colour for each person, starting with a leaf for themselves.
- Write the name the child says
Write on the leaf what the child calls that person, such as Nana, Baba or the name of a pet.
- Glue and decorate
The child glues each leaf anywhere on the tree and adds grass, a sun or drawings with crayons.
The sample tree has seven leaves that Noor chose
The tree at the top of this page was drawn for this guide as the work of Noor, a fictional child aged four. She put herself at the top, then her mother and her sister Lila. She added Nana Bea, who lives with the family, and Uncle Sami, who lives abroad and whom she sees on video calls.
Her last two leaves are Pickle the cat and Mr Ortiz, the neighbour who waves from his garden. Noor did not make a leaf for her father, and the adult did not ask why. The number of leaves, the colours and the places are all hers.
Show a sample like this one before the children begin. A pet and a neighbour on it tell children that those choices are welcome.
Let each child decide what the tree shows
A preschool family tree craft goes on a wall, into a bag and home to people the staff may never meet. A child cannot weigh that, so the adult protects the choice for them. Accept every leaf, and accept a tree with one leaf.
Do not ask who is missing, count the leaves aloud or compare one tree with another. If a child names someone who has died or who lives elsewhere, write the name as you would any other. If a child says something that worries you, follow the safeguarding procedure of your setting after the session and keep the craft itself ordinary.
Some children would rather not make a tree about themselves. Offer a tree for a family in a picture book the group knows, for a set of toy animals, or for the class itself with one leaf for each child who wants one.
Tell carers about the craft before the day
A short note a few days ahead lets carers prepare a child, mention a recent change at home, or ask for the picture book version. The note below can be copied and changed to suit your setting.
A note for carers
- This week your child will make a paper family tree with one leaf for each person they choose.
- Children decide who goes on the tree, and every choice is welcome, including pets and friends.
- We will write each name as your child says it.
- Please tell us beforehand if there is anything you would like us to know.
- Your child can make a tree about a storybook family if they prefer.
What we will not do
- We will not ask children about anyone they leave out.
- We will not display a tree without asking you first.
Adjust the craft for younger and older children
Children of two enjoy the gluing more than the choosing. Give each child three or four leaves and name nobody unless the child does.
Children of five often want to write. Let them copy a name from your writing, or draw a face on the leaf in place of a word.
For the same idea with hands as leaves, see the family tree handprint activity. For children of seven and over, the family tree activity ideas move on to rows, lines and a finished chart.
Common questions
How long the craft takes
About 30 minutes with the pieces cut beforehand. Cutting a trunk and ten leaves takes an adult about five minutes for each child.
Whether the leaves should follow the generations
Not at this age. Preschool children think about who is close to them, and the order of generations means little before about six. Leaves in any order make a truthful tree.
What to do when a child has nobody to add
Start with a leaf for the child, then offer one for a pet, a toy or a person at preschool. A tree with one leaf is complete, and the child can add to it another day.
For a second session, the handprint tree keeps the same choices and adds traced hands and a printable sheet.
See the handprint tree activity